
Showing posts with label recipes. Show all posts
Showing posts with label recipes. Show all posts
Tuesday, September 28, 2010
Fricase de Pollo Cubano
I'm making a Cuban dinner tomorrow for some friends and decided to give them a recipe for one of my favorite Cuban dishes as a little thank you for coming. I made a cute recipe card and thought, this should go up on the blog! So here you go. If you click on the image, you can view the card larger and download it for your own use. Enjoy!

Sunday, February 28, 2010
Plantains Done Two Ways
Tostones

Not being able to have Coke has been tough, but bacon is what I really miss. I have been good lately, but not as good as I should be. Hence the following recipe. I made arroz con pollo, and you just can't have it without fried plantains. I guess I have to have my little indulgences or I'll go mad. There's a lot of talk about how to make great tostones, but I am just offering my family's humble contribution.
Plantains may look like bananas, and they are related, but bananas have a sweeter taste, while plantains are less sweet. Plantains require cooking in order to be edible, even when they are overripe, the sweetest stage of its life. It is a testament to the survival skills of my people that plantains have ever been considered edible. You pretty much have to be starving to try and figure out how to make these babies worth eating, because if regular bananas are around, you'd just go for those. No cooking required! Plantains have been around forever, and all over the world. Seriously, they are indigenous to Africa, Asia, North America, South America, the Pacific Islands, Australia, pretty much everywhere but Europe.
Picking plantains at the market is strange if you don't know what you are looking for. Generally, there will be very green ones, some mottled green and dark ones, some yellow ones, and if you are lucky, some soft yellow ones with lots of black spots. All of these are plantains in different stages of life, and all are good for different dishes. None of them are "bad" or spoiled.

The underripe plantain is very green. These green shades, or even the yellow in the middle, are best for tostones, or fried plantains. Pronounce it toast-own-es, not tostonz. They are salted and eaten as a side or appetizer, much like They yellow and yellow-black ones are best for platanos maduros, the sweeter fried version.
What you need to get started?
A plantain, a knife, and a paper bag.

You start by peeling the fruit, but don't expect it to be easy like with a banana. Between this and the yuca I'm starting to think that Cuban cooking is for brawny babes. I like to score the sides with a knife, all the way from stem to stem so that you can create sections in the peel. Then, start peeling. If parts of the peel won't budge, try slicing them off, but only as a last resort. This is tougher with the greener plantains. Generally the dark yellow ones are fairly soft and easy to peel.

Once you get it peeled, slice 'em up. I like to go for about one inch pieces, because I don't like the finished product to be too thin. If they are too thin, they are easy to burn and you don't get any plantain flavor.

They are too hard to smash at this point, so you have to fry them for just a little bit. I used Smart Balance canola oil, but you can use vegetable oil. I suppose you could boil them in water, but that can destroy the flavor. Fry them for a few minutes on each side. Here you see the color after frying on the middle piece. Just getting a little softness, not browning them.

After they come out of the spa, let a paper towel remove some of the excess oil.

After a couple minutes of cooling, you are ready to smash them up! This is where the paper bag comes in. There are tostone makers and all kinds of gadgets for this, but this works best for me. For some reason, paper bags are the best. They don't stick to the plantain and they are a good barrier between you and the hot little slice.

I place the slice in the middle and use a spatula to press down the plantain. I place my hand over the spatula and press slightly, until I feel that it has smashed.

This is what you want. Not too smashed so that it breaks apart, but obliterating the cylindrical shape completely.

Do this for all of them, and get ready to fry! Get the oil nice and hot again.

And stick 'em in there. Once they are browned around the edges, turn them over and make sure they get nice and brown.

Remember to let the paper towels soak the oil and salt them just a little bit. Extra tasty.
Platanos Maduros

Platanos Maduros are a lot easier. Most Cuban restaurants serve them with dishes. They are sweet and fried deliciousness. There's no smashing, no double fry, just slicing and frying. Of course, those extra dark yellow plantains are easy to peel as well. You just slice them on the bias, then place them in hot oil, browning them on both sides, then lower the heat on the oil and continue to fry them until they are dark brown and carmelized. Some people roll them in brown sugar or white sugar before frying, but we've never really done that.
Hope you enjoy these treats. Learn more about plantains here, and here.

Not being able to have Coke has been tough, but bacon is what I really miss. I have been good lately, but not as good as I should be. Hence the following recipe. I made arroz con pollo, and you just can't have it without fried plantains. I guess I have to have my little indulgences or I'll go mad. There's a lot of talk about how to make great tostones, but I am just offering my family's humble contribution.
Plantains may look like bananas, and they are related, but bananas have a sweeter taste, while plantains are less sweet. Plantains require cooking in order to be edible, even when they are overripe, the sweetest stage of its life. It is a testament to the survival skills of my people that plantains have ever been considered edible. You pretty much have to be starving to try and figure out how to make these babies worth eating, because if regular bananas are around, you'd just go for those. No cooking required! Plantains have been around forever, and all over the world. Seriously, they are indigenous to Africa, Asia, North America, South America, the Pacific Islands, Australia, pretty much everywhere but Europe.
Picking plantains at the market is strange if you don't know what you are looking for. Generally, there will be very green ones, some mottled green and dark ones, some yellow ones, and if you are lucky, some soft yellow ones with lots of black spots. All of these are plantains in different stages of life, and all are good for different dishes. None of them are "bad" or spoiled.
The underripe plantain is very green. These green shades, or even the yellow in the middle, are best for tostones, or fried plantains. Pronounce it toast-own-es, not tostonz. They are salted and eaten as a side or appetizer, much like They yellow and yellow-black ones are best for platanos maduros, the sweeter fried version.
What you need to get started?
A plantain, a knife, and a paper bag.

You start by peeling the fruit, but don't expect it to be easy like with a banana. Between this and the yuca I'm starting to think that Cuban cooking is for brawny babes. I like to score the sides with a knife, all the way from stem to stem so that you can create sections in the peel. Then, start peeling. If parts of the peel won't budge, try slicing them off, but only as a last resort. This is tougher with the greener plantains. Generally the dark yellow ones are fairly soft and easy to peel.

Once you get it peeled, slice 'em up. I like to go for about one inch pieces, because I don't like the finished product to be too thin. If they are too thin, they are easy to burn and you don't get any plantain flavor.

They are too hard to smash at this point, so you have to fry them for just a little bit. I used Smart Balance canola oil, but you can use vegetable oil. I suppose you could boil them in water, but that can destroy the flavor. Fry them for a few minutes on each side. Here you see the color after frying on the middle piece. Just getting a little softness, not browning them.

After they come out of the spa, let a paper towel remove some of the excess oil.

After a couple minutes of cooling, you are ready to smash them up! This is where the paper bag comes in. There are tostone makers and all kinds of gadgets for this, but this works best for me. For some reason, paper bags are the best. They don't stick to the plantain and they are a good barrier between you and the hot little slice.

I place the slice in the middle and use a spatula to press down the plantain. I place my hand over the spatula and press slightly, until I feel that it has smashed.

This is what you want. Not too smashed so that it breaks apart, but obliterating the cylindrical shape completely.

Do this for all of them, and get ready to fry! Get the oil nice and hot again.

And stick 'em in there. Once they are browned around the edges, turn them over and make sure they get nice and brown.

Remember to let the paper towels soak the oil and salt them just a little bit. Extra tasty.
Platanos Maduros
Platanos Maduros are a lot easier. Most Cuban restaurants serve them with dishes. They are sweet and fried deliciousness. There's no smashing, no double fry, just slicing and frying. Of course, those extra dark yellow plantains are easy to peel as well. You just slice them on the bias, then place them in hot oil, browning them on both sides, then lower the heat on the oil and continue to fry them until they are dark brown and carmelized. Some people roll them in brown sugar or white sugar before frying, but we've never really done that.
Hope you enjoy these treats. Learn more about plantains here, and here.
Monday, January 18, 2010
Martha's Latest

The new issue of Martha Stewart Living is out, and while I don't often buy this magazine, I seem to always get it for Halloween and Valentine's Day. I like hearts year-round, so the cute stuff in here is worth the $6 for the magazine. I try not to buy too many magazines these days, but sometimes I splurge. Things I loved from this issue:

The melted chocolate filigree hearts that adorn this otherwise plain cupcake are really sweet and simple. It says to use a parchment bag or a plastic ziplock bag to pipe the filagree, but I tried the plastic bag and it was too hot to handle. It made my drizzles very...abstract in the recipe for peanut butter cookies below. You'll see...
I also loved the article on cake stands. Apparently Martha collects them, and since she's crazy rich she has a gigantic collection:


There were several pages of different kinds, ceramic, glass, milk glass, colored glass, it's amazing the array of choices. I don't have a cake stand, but I've been wanting one. Another "when we move" purchase. As of now, I don't even think I'd have room for a cake stand, so if we downsize in the kitchen by any amount, a cake stand will have nowhere to be! But I like the idea of presenting your food (cake isn't the only thing these babies are for) up on a pedestal.
By far though, the coolest article was about Darcy Miller, who has published books on weddings and is editorial director of Martha Stewart Weddings. As someone big into family history, preserving family history, and museums, this simple yet impactful display really caught my eye.
She has created a display wall in her home with shadowboxes and framed images. Among the regular old family photos are boxes with little keepsakes and photos.

Here's a close up:
 One box has a picture from the delivery room, a pic of baby's first sonogram and the hospital ID bracelet. These are things usually kept in drawers and treasured but never really seen by anyone, so I thought this was great. Next to that is a box full of crayons that someone got too old to play with anymore, and another box with a little baby bathing suit! My Little Pony adorns the middle box as well.
Other things from the big wall include: a shadowbox with a bunch of baby sunglasses, with a picture of baby wearing them in the foreground; a picture of a kid in full swim-meet regalia with the winner's ribbon draping the front, a shadow box with tiny dolls in front of a picture of baby playing with them. I don't even have kids and I thought this was awesome! Of course, even the childless among us can do this for other things like concerts that were special, dates or trips where you saved a little souvenir. And the super modern vibe here can be played with as well. You could easily do this with a lot of vintage frames and boxes. Or use cheap wood boxes from Micheal's and glue vintage frames to the front of them to give it some cohesiveness.
This is a cool way to showcase the ephemera or items that are meaningful to you personally, but that nobody would find very meaningful without the juxtaposition of an image or other items for context.
I'm so doing this in the new place!
And now, for the cookie portion of today's post!

It's rainy and windy in Long Beach today, but not so cold that I couldn't walk my dog in flip flops. Either way, it called for matzo ball soup for lunch and home made peanut butter cookies. I used Martha Stewart's recipe, which is amazing. Perfectly soft and not dry like some peanut butter cookies can be. I just jazzed it up with some melted chocolate. Who doesn't love the peanut butter and chocolate combo? Whenever there are mini Reese's peanut butter cups in the house (once a year we get a bag for Halloween and proceed to pretty much eat them ourselves), they don't last long.

I realized that I had some super fine baker's sugar, which I have to use up before we move, so I used that in place of the regular granulated sugar. I don't know if it makes such a big difference in cookies, but the texture of the dough was very smooth. One thing I should probably buy is good vanilla extract. I use the generic brand from the grocery store and I just know the better stuff would add something. Do you use fancy ingredients like that? Is it worth it? Do you really taste the difference?

The Wikipedia entry on peanut butter cookies indicates that pressing the dough is important so that it bakes evenly, but claims that the cross-hatched fork tines way of doing so is not necessary. But then, how would you know it's a peanut butter cookie? It's like sacrilege not to do it, right?

If a cookie happens to break on the way from the cookie sheet to the cooling rack, that's not really my fault, but as the cook, I'm obligated to eat it. It's a safety thing, I think.

My addition is the swizzles of melted chocolate. I just melted semi-sweet chocolate chips and did some drizzling. The recipe says it makes two dozen, but I counted about 4 more cookies than that. I don't like giant cookies though, so maybe that's where me and Martha differ.

Monday, January 4, 2010
Cuban Tamales

After a couple of attempts, I have finally had tamale success! My grandmother's recipe was very short and left me with a lot of questions. I'm not sure if I got the answers right, but the resulting dish is very, very tasty.
Most people know Mexican tamales, but Cuban tamales are a little different. Definitely sweeter, and swirling with pork bits in addition to the lump or two of pork in the center. I highly encourage people who have never really liked tamales to give these a try, they might change your mind. Before the 1959 revolution, Cubans often ate Mexican-style tamales sold from street vendors. Evidence suggests that it was a Mexican import during the 1920s and 30s, since the kind and shape of Cuban tamales is similar to tamales popular in Mexico City at that time.
The best thing about doing this transcription of my grandmother's recipes (besides eating the food of course) is that her wording and descriptions brings back her voice in a lot of ways. I know she'd probably be pushing me out of the way to do it herself (the "right" way) if she were here. It is daunting though, to try and figure out what "a good amount" of butter meant to her. But that's the way she described her process. Getting these recipes down is partly about transcribing from Spanish to English, partly about figuring out what kind of ingredients she's describing, but mostly about trying to think the way she thought. When she says "4 litres of pork," I have to think about the kind of cut she used to buy and the way she cooked it. When she says "seasoned corn," I have to remember what kind of spices made up her idea of "seasoning."
 Grandma in the kitchen (R), Cuba, 1950s
This could be a vegetarian dish, though I'm not sure about vegan, unless there are vegan ways of creaming corn and buttering. You could put whatever you want in a tamal, but please don't tell me if you do something heinous like put broccoli in there. I just don't need to know the extent to which you devastate a cultural and family legacy, OK?
Here goes:
Ingredients:
- 1 lb. of cooked pork (I'm using the leftovers from yesterday's Cuban Feast, but grandma often simmered pork in a sauce, drained the sauce and tore up the remaining pork for this dish)
- 16 oz. corn (I used a frozen bag)
- 2 14 oz. cans of creamed corn
- 12 oz of Yellow Corn Meal (Masarepa corn meal specifically)
- 1 package of Sazon Goya
- 1/4 cup of butter
- 1 cup of water
- 1 tablespoon of sugar
I know it looks like I'm shilling for Goya, but these products are most available, so that's what I use. Sazon is a kind of annatto seasoning packet. Annatto is a spice that has long been used as a dye and a flavoring agent in Latin America. Once you buy a package of this stuff, you won't regret it. I use it for arroz con pollo, fricase de pollo, as a way to spice up a simmering sauce for potatoes. It will become a staple. It also stains hands, sinks, and counters, so be careful!

The Masarepa corn meal is a must for this recipe. I tried making it with regular old Albers corn meal in the orange and blue box and the tamales were creamy and tasty, but didn't hold together and have the texture they needed. My grandmother's original recipe called simply for "harina maiz" without specifying what kind. When I told my mom about my tamales that didn't hold together well, she had a flash of memory. My grandmother had once told her in a market, "Pay attention to the kind of corn meal I'm buying, because after I'm gone you're going to try to use regular corn meal and it's not going to work." Bless her for doing that!
 Get the corn to room temperature and pulse it in the food processor. Add the creamed corn and pulse that too. I like a few corn kernels to be mingling around in the tamal, but many people like a very consistent creamy texture. To do that, you really need to process the corn. Add the Sazon packet and mix it in well.
In a large pan or med-large pot, melt 1/4 cup of butter. Once it's melted, add your corn mixture. Stir in a tablespoon of sugar and a cup of water. If you wanted to use a broth you could. You could even replace some of the water with milk if you wanted a really creamy flavor.
Add in the 12 oz. of corn meal and stir this mixture up until it starts to thicken. It won't take too long, only a few minutes. For larger batches, you might be stirring for 10 minutes. This thickening didn't really happen when I used regular corn meal, but in my most recent attempt with the right ingredient, I could really see the difference. I whisked it up and there was definitely resistance immediately. When I lifted the whisk, a big clump remained inside. This is what you want:

Once it got to this point, I put in the pork and stirred it up. My pork was already warm, but if you need to, turn the heat low and warm up the pork you've put in the pan. Just make sure it doesn't get too dry.
Take it off the stove and let it cool for a few minutes. Don't worry, you have plenty of tamale packets to make, so you won't be bored. You could use corn husks that are soaked in water, and most foodies will want to do it this way because it satisfies some sort of need for authenticity in foreign food ways, but when aluminum foil became cheap and popular in the U.S. during World War II, guess what? It also became popular in Cuba. Since then, most at-home cooks prefer this method, which guarantees your tamales won't leak out into the simmering water during the steaming process.
To make the foil packets I pull out about two feet of foil and fold it in half length-wise. Cut this in half and you have the beginning of two packets.
You'll want to fold the edges on all three sides three times:

What you will have looks something like this:

This batch made 20 small tamales for me. You can try and make them bigger by devising bigger packets, but this is more of a side or even a snack, not a meal, so I try to keep mine almost square.
Once you've made a few, start filling them up. Pry open the packet a bit:

Then take a large spoon and shovel in some of your lovely tamale mixture. I like to push down a bit of plain mixture, add some large pork pieces, then fill with more mix.

Be sure to leave room to close off the top of the packet. It should be something like this:


The final cooking phase begins, where you steam them for, no joke, 3-4 hours. I know, it seems like a lot, but they need to steam to perfection. I placed mine in a deep pot filled halfway up with water. Make sure the tops are on top, as the top seam is often the least sturdy. If you have a pressure cooker, you could probably have them done much sooner, something like 20 minutes, but this idea occurred to me just now so I don't know how they really come out. You need the steaming to get that meal to hold together. Some recipes call for a much shorter cooking time, but my grandmother's says 3-4 hours, so that's what I did.

You can serve these a number of ways. Some people serve them with carmelized onions and garlic on top. Others actually put ketchup on the side. If it's a side for a meal, you could consider it as the starch for sure. I like it all by itself, that's how tasty this is for me. But it brings back memories of my totally fierce and amazing grandmother, who bitched about having to cook but loved doing it anyway.
 Maria Caridad Leonor Garcia Morffi
My grandmother
Sunday, January 3, 2010
Cuban Feast
 masitas de puerco frita, yuca con mojo, y arroz con frijoles
or fried pork, yucca with garlic oil, and black beans with white rice
This is the traditional Cuban-American meal for Christmas Eve, or what we call "Noche Buena" ("good night"). If you have a big family, or are particularly evil, you roast a suckling pig (lechon). I think for the most part my family has always roasted a pork leg for Noche Buena. Cubans in Cuba didn't open gifts on Christmas Day. They had a big meal on Christmas Eve and then waited until January 6th, Three Kings Day (when the three kings brought presents to the baby Jesus) to open gifts. Some people still observe Three Kings Day, but we never did. We opened up gifts with all the other American kiddos, bright and early on December 25th. Too early for my parents I'm sure!
 One of our Noche Buena celebrations in Lennox, California.
Probably around 1984.
I'm at the top of this Cuban pyramid.
In addition to translating and trying out my grandmother's recipes, I've also been paying attention to my mom's cooking style, since she learned it from the source! Whenever I have a question about a vague set of instructions in the recipes, she comes to the rescue. This recipe is good enough for about four people, and I really don't think she can comprehend how to do such a thing. She cooks for a minimum of 8 people, which is actually an improvement over my grandmother's policy of cooking for 12-15 people. Seriously, we had pots that I have seen only in restaurant kitchens, they were so big. The following is an amended recipe, but in keeping with the flavor and style of the old recipe book.
The Pork
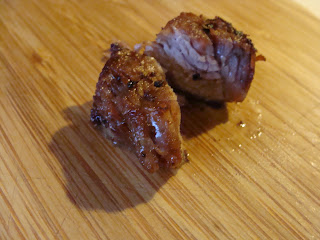
What is key to getting the pork right? Well, the right cut of pork, the right marinade, and making sure it's soft on the inside and glazed and crisp on the outside. It has taken me awhile to do this well on my own, but there are a few key tricks that most online and book recipes don't tell you. Here's the deal:
My mother buys pork shoulder. I always tried this recipe with pork tenderloin, because they always have it at the grocery store, but it didn't turn out too good. Don't get me wrong, it didn't taste bad, but it was tougher and drier than shoulder, which has a good deal of delicious fat running through it. I bought 2lbs of pork shoulder "ribs" for this meal that were cut like short ribs in long strips. I cut those strips into 1-2 inch cubes (saving a good piece with bone to flavor the beans) and put them in a big pot with a lid, added a little olive oil, salt and pepper, and then poured over the marinade, tossing to coat everything. I left it in the fridge overnight. For four people, you could use less pork, but you'll want leftovers. I used my leftovers to make tamales...but that's another post.
 The Marinade
Goya makes an amazing product for this step called Mojo Criollo, or "creole marinade." It's what my family has always used, but for some reason the markets around me don't carry it. I know there's got to be some little bodega that has it, but it's not one of the more popular Goya products in my shopping area. If you do find it, step one is done- marinade accomplished. If you don't, here's how to make your own mojo criollo from scratch, which I like doing anyway.
Mojo Criollo
Seville oranges grow in Cuba, and they tend to be bitter, but this is a central component to the marinade. If you don't have access to seville oranges, a good substitute is 2/3 c. of regular sweet orange juice mixed with 1/4 cup of lime juice.
Finally the next day arrives and you're ready to cook. Take the pork out of the fridge and set that pot right on the stove. Add enough water to the marinade to come up 3/4 of the way to the top of the meat. Add about 1/4 cup of vegetable oil. Heat to a simmer uncovered for 40 minutes. After the water has evaporated, you'll be left with very soft pork, the simmering marinade, and the oil.

This is the point where you turn up the heat a little and get the outside of the pork to be nice and crisp. If you need to add a bit more oil, do, but sparingly. I used a cast iron pot, but something non-stick would have been better, in retrospect. If the pork isn't browning up like you'd like, use a pinch of sugar to carmelize it up. The pic at the top of this section is what you want your pork chunks to look like, soft on the inside, brown and crisp on the outside. Delicious!
 My mother's most recent Noche Buena pork and yuca.
She does something magical to make the pork break apart so delicately.
I think it's that there's just so much of it!
 One of our Noche Buena celebrations in Lennox, California.
Probably around 1984.
I'm at the top of this Cuban pyramid.
In addition to translating and trying out my grandmother's recipes, I've also been paying attention to my mom's cooking style, since she learned it from the source! Whenever I have a question about a vague set of instructions in the recipes, she comes to the rescue. This recipe is good enough for about four people, and I really don't think she can comprehend how to do such a thing. She cooks for a minimum of 8 people, which is actually an improvement over my grandmother's policy of cooking for 12-15 people. Seriously, we had pots that I have seen only in restaurant kitchens, they were so big. The following is an amended recipe, but in keeping with the flavor and style of the old recipe book.
The Pork

What is key to getting the pork right? Well, the right cut of pork, the right marinade, and making sure it's soft on the inside and glazed and crisp on the outside. It has taken me awhile to do this well on my own, but there are a few key tricks that most online and book recipes don't tell you. Here's the deal:
- 2lbs of pork shoulder, cut into cubes
My mother buys pork shoulder. I always tried this recipe with pork tenderloin, because they always have it at the grocery store, but it didn't turn out too good. Don't get me wrong, it didn't taste bad, but it was tougher and drier than shoulder, which has a good deal of delicious fat running through it. I bought 2lbs of pork shoulder "ribs" for this meal that were cut like short ribs in long strips. I cut those strips into 1-2 inch cubes (saving a good piece with bone to flavor the beans) and put them in a big pot with a lid, added a little olive oil, salt and pepper, and then poured over the marinade, tossing to coat everything. I left it in the fridge overnight. For four people, you could use less pork, but you'll want leftovers. I used my leftovers to make tamales...but that's another post.
The MarinadeGoya makes an amazing product for this step called Mojo Criollo, or "creole marinade." It's what my family has always used, but for some reason the markets around me don't carry it. I know there's got to be some little bodega that has it, but it's not one of the more popular Goya products in my shopping area. If you do find it, step one is done- marinade accomplished. If you don't, here's how to make your own mojo criollo from scratch, which I like doing anyway.
Mojo Criollo
 1 cup of seville orange juice
Seville oranges grow in Cuba, and they tend to be bitter, but this is a central component to the marinade. If you don't have access to seville oranges, a good substitute is 2/3 c. of regular sweet orange juice mixed with 1/4 cup of lime juice.
- 7-10 cloves of garlic, chopped
- thinly sliced small onion/half a regular onion
- teaspoon of salt
- teaspoon of cumin
- teaspoon of dried oregano
- pinch of pepper
Finally the next day arrives and you're ready to cook. Take the pork out of the fridge and set that pot right on the stove. Add enough water to the marinade to come up 3/4 of the way to the top of the meat. Add about 1/4 cup of vegetable oil. Heat to a simmer uncovered for 40 minutes. After the water has evaporated, you'll be left with very soft pork, the simmering marinade, and the oil.

This is the point where you turn up the heat a little and get the outside of the pork to be nice and crisp. If you need to add a bit more oil, do, but sparingly. I used a cast iron pot, but something non-stick would have been better, in retrospect. If the pork isn't browning up like you'd like, use a pinch of sugar to carmelize it up. The pic at the top of this section is what you want your pork chunks to look like, soft on the inside, brown and crisp on the outside. Delicious!
 My mother's most recent Noche Buena pork and yuca.
She does something magical to make the pork break apart so delicately.
I think it's that there's just so much of it!
The Yuca

Yuca, or cassava, is a woody shrub grown for its edible root, which looks like the above picture and is sort of like a yam, but not very sweet. It looks pretty uggo if you ask me. It's native to South America and the surrounding tropics, so lots of other Latin-Caribbean cultures use it. People mash it, put it in soups, puree it up just like you would a potato. Basically, you cut off the bark, chop into 2-4 inch pieces and boil it for an hour to soften it. It has an interesting texture that I didn't used to like as a kid, but now I look forward to it every year.
- 1 lb of yuca

Chopping off the bark is something I was unprepared for. It's tough and dangerous, and I found myself wondering when the hell my grandmother ever did this, because I certainly didn't remember her doing it or seeing the purple and brown bark bits around the kitchen. I asked my mom about it days later and she admitted that they had always bought it already peeled and frozen in the frozen vegetable section of the Latin market. Asian markets have it too. Wish I'd known!

Anyway, you make sure there's enough water to cover it and boil the chunks until they are soft, like fall off the fork soft, but before they disintegrate. It took mine about an hour, but they were large chunks. After they have been drained and any woody bits removed from the centers, set them on a plate, salt them, and drench them the garlic mojo, which is just garlic, onions and olive oil heated until fragrant. You can also fry it up a little in the oil and get the outside somewhat crispy, but remember olive oil burns faster than vegetable oil.
 close up of yummy yuca with garlic mojo
The Black Beans
Black beans done the traditional way take time, a pressure cooker, and lots of patience. My way is a simple but tasty alternative.
- 1-2 cups of black beans
You can soften black beans overnight or use (gasp!) canned black beans. If you use canned (and I totally secretly do), be sure they are low sodium, good quality, and that you rinse them well.
- 1 tbsp. olive oil
- 1/2 yellow onion, finely diced
- 1/4 green bell pepper, finely diced
- 3-4 cloves garlic, chopped
Start a small pot on medium-high heat and pour in theolive oil. Add in half an onion and maybe a quarter to a half of a green bell pepper. Salt and pepper them and sautee for a few minutes until their golden, then add the garlic. If you add the garlic too early, it will brown and bitter up your dish, so be sure to wait. You have just made what we call a "sofrito." This is the basis of a lot of Cuban dishes. Once the garlic has heated through, add the following spices:
- 1/2 tsp. dried oregano
- 1 tsp. cumin
- 1 bay leaf
Then add
- 1/4 cup of white vinegar
- 1/4 cup dry white wine.
Your pot should look like this:
 The beans are barely at the surface of the liquid. If you don't have enough liquid, pour in some water or stock/broth. If you have too much, just cook it longer. With this dish, the longer you let the beans simmer, the tastier they will be. I brought them to a boil and simmered them, uncovered, for about 2 hours. You could totally do it in one, but since I had all the other dishes going on, it wasn't hard to occasionally stir the beans.
Pour a couple of spoonfuls of beans over white steamed rice and you have yourself a meal!
Best way to make all of these together so they are all hot on the table:
Start the pork & marinade the day before (obvs.)
Next day, start the beans and get them to a simmer. (couple hours cooking time)
Put the pork on the stove and get it started. (1-1 1/2 hours cooking time)
Get the yuca started (1 hour cooking time, maybe less)
20 minutes from dinner-time, steam the rice
10 minutes from dinner time, cook up the oil/garlic/onion mojo for the yuca.
Yes, it's a pain in the ass dinner.
Yes, it requires a lot of your time.
That's why we do it once a year.
It's totally worth it!!
Tomorrow, how I turn the leftover pork chunks into tasty filling for Cuban style tamales.
Subscribe to:
Posts (Atom)