Showing posts with label cuban cooking. Show all posts

Wednesday, September 29, 2010

Dinner Guests

Had my lovely dinner guests tonight! It was nice to cook for more than two people. It was kind of a gloomy day today, though it didn't rain hardly at all. It's supposed to rain heavily tomorrow.


I made my version of the noche buena dinner: pork, rice and black beans, with some tostones and croquetas. It was pretty tasty.  I love when I have guests over because it means all that cleaning is for a good reason. I took some pictures of the apartment now that it is spic n span:


M. went to Whole Foods and chose two different desserts: hamentashen and mini cupcakes!


A good time was had by all. Radley especially enjoyed having a little kid around. He kissed that kid the whole time and is currently fast asleep from playing all night. And as with any good party, at least one person had to be carried out:
Goodnight, Xavier!


It's nice to have friends that live a few blocks away. Josh and Michele (Xavier's parents) were telling us about the fun that can be had on snow days in the area. Basically, when the city shuts down due to snow (which happened tons of times last year), they know which bars and restaurants open. So we can avoid becoming too stir crazy and get much needed nourishment. Cool! Is it wrong to look forward to that?


Tuesday, September 28, 2010

Fricase de Pollo Cubano

I'm making a Cuban dinner tomorrow for some friends and decided to give them a recipe for one of my favorite Cuban dishes as a little thank you for coming. I made a cute recipe card and thought, this should go up on the blog! So here you go. If you click on the image, you can view the card larger and download it for your own use. Enjoy!


Monday, January 4, 2010

Cuban Tamales


After a couple of attempts, I have finally had tamale success! My grandmother's recipe was very short and left me with a lot of questions. I'm not sure if I got the answers right, but the resulting dish is very, very tasty.

Most people know Mexican tamales, but Cuban tamales are a little different. Definitely sweeter, and swirling with pork bits in addition to the lump or two of pork in the center. I highly encourage people who have never really liked tamales to give these a try, they might change your mind. Before the 1959 revolution, Cubans often ate Mexican-style tamales sold from street vendors. Evidence suggests that it was a Mexican import during the 1920s and 30s, since the kind and shape of Cuban tamales is similar to tamales popular in Mexico City at that time.

The best thing about doing this transcription of my grandmother's recipes (besides eating the food of course) is that her wording and descriptions brings back her voice in a lot of ways. I know she'd probably be pushing me out of the way to do it herself (the "right" way) if she were here. It is daunting though, to try and figure out what "a good amount" of butter meant to her. But that's the way she described her process. Getting these recipes down is partly about transcribing from Spanish to English, partly about figuring out what kind of ingredients she's describing, but mostly about trying to think the way she thought. When she says "4 litres of pork," I have to think about the kind of cut she used to buy and the way she cooked it. When she says "seasoned corn," I have to remember what kind of spices made up her idea of "seasoning."

Grandma in the kitchen (R), Cuba, 1950s

This could be a vegetarian dish, though I'm not sure about vegan, unless there are vegan ways of creaming corn and buttering. You could put whatever you want in a tamal, but please don't tell me if you do something heinous like put broccoli in there. I just don't need to know the extent to which you devastate a cultural and family legacy, OK?

Here goes:

Ingredients:

  • 1 lb. of cooked pork (I'm using the leftovers from yesterday's Cuban Feast, but grandma often simmered pork in a sauce, drained the sauce and tore up the remaining pork for this dish)
  • 16 oz. corn (I used a frozen bag)
  • 2 14 oz. cans of creamed corn
  • 12 oz of Yellow Corn Meal (Masarepa corn meal specifically)
  • 1 package of Sazon Goya
  • 1/4 cup of butter
  • 1 cup of water
  • 1 tablespoon of sugar


I know it looks like I'm shilling for Goya, but these products are most available, so that's what I use. Sazon is a kind of annatto seasoning packet. Annatto is a spice that has long been used as a dye and a flavoring agent in Latin America. Once you buy a package of this stuff, you won't regret it. I use it for arroz con pollo, fricase de pollo, as a way to spice up a simmering sauce for potatoes. It will become a staple. It also stains hands, sinks, and counters, so be careful!


The Masarepa corn meal is a must for this recipe. I tried making it with regular old Albers corn meal in the orange and blue box and the tamales were creamy and tasty, but didn't hold together and have the texture they needed. My grandmother's original recipe called simply for "harina maiz" without specifying what kind. When I told my mom about my tamales that didn't hold together well, she had a flash of memory. My grandmother had once told her in a market, "Pay attention to the kind of corn meal I'm buying, because after I'm gone you're going to try to use regular corn meal and it's not going to work." Bless her for doing that!

Get the corn to room temperature and pulse it in the food processor. Add the creamed corn and pulse that too. I like a few corn kernels to be mingling around in the tamal, but many people like a very consistent creamy texture. To do that, you really need to process the corn. Add the Sazon packet and mix it in well.


In a large pan or med-large pot, melt 1/4 cup of butter. Once it's melted, add your corn mixture. Stir in a tablespoon of sugar and a cup of water. If you wanted to use a broth you could. You could even replace some of the water with milk if you wanted a really creamy flavor.

Add in the 12 oz. of corn meal and stir this mixture up until it starts to thicken. It won't take too long, only a few minutes. For larger batches, you might be stirring for 10 minutes. This thickening didn't really happen when I used regular corn meal, but in my most recent attempt with the right ingredient, I could really see the difference. I whisked it up and there was definitely resistance immediately. When I lifted the whisk, a big clump remained inside. This is what you want:


Once it got to this point, I put in the pork and stirred it up. My pork was already warm, but if you need to, turn the heat low and warm up the pork you've put in the pan. Just make sure it doesn't get too dry.

Take it off the stove and let it cool for a few minutes. Don't worry, you have plenty of tamale packets to make, so you won't be bored. You could use corn husks that are soaked in water, and most foodies will want to do it this way because it satisfies some sort of need for authenticity in foreign food ways, but when aluminum foil became cheap and popular in the U.S. during World War II, guess what? It also became popular in Cuba. Since then, most at-home cooks prefer this method, which guarantees your tamales won't leak out into the simmering water during the steaming process.

To make the foil packets I pull out about two feet of foil and fold it in half length-wise. Cut this in half and you have the beginning of two packets.

You'll want to fold the edges on all three sides three times:


What you will have looks something like this:


This batch made 20 small tamales for me. You can try and make them bigger by devising bigger packets, but this is more of a side or even a snack, not a meal, so I try to keep mine almost square.

Once you've made a few, start filling them up. Pry open the packet a bit:


Then take a large spoon and shovel in some of your lovely tamale mixture. I like to push down a bit of plain mixture, add some large pork pieces, then fill with more mix.

Be sure to leave room to close off the top of the packet. It should be something like this:


The final cooking phase begins, where you steam them for, no joke, 3-4 hours. I know, it seems like a lot, but they need to steam to perfection. I placed mine in a deep pot filled halfway up with water. Make sure the tops are on top, as the top seam is often the least sturdy. If you have a pressure cooker, you could probably have them done much sooner, something like 20 minutes, but this idea occurred to me just now so I don't know how they really come out. You need the steaming to get that meal to hold together. Some recipes call for a much shorter cooking time, but my grandmother's says 3-4 hours, so that's what I did.


You can serve these a number of ways. Some people serve them with carmelized onions and garlic on top. Others actually put ketchup on the side. If it's a side for a meal, you could consider it as the starch for sure. I like it all by itself, that's how tasty this is for me. But it brings back memories of my totally fierce and amazing grandmother, who bitched about having to cook but loved doing it anyway.
Maria Caridad Leonor Garcia Morffi
My grandmother

Sunday, January 3, 2010

Cuban Feast

masitas de puerco frita, yuca con mojo, y arroz con frijoles
or fried pork, yucca with garlic oil, and black beans with white rice


This is the traditional Cuban-American meal for Christmas Eve, or what we call "Noche Buena" ("good night"). If you have a big family, or are particularly evil, you roast a suckling pig (lechon). I think for the most part my family has always roasted a pork leg for Noche Buena. Cubans in Cuba didn't open gifts on Christmas Day. They had a big meal on Christmas Eve and then waited until January 6th, Three Kings Day (when the three kings brought presents to the baby Jesus) to open gifts. Some people still observe Three Kings Day, but we never did. We opened up gifts with all the other American kiddos, bright and early on December 25th. Too early for my parents I'm sure!

One of our Noche Buena celebrations in Lennox, California.
Probably around 1984.
I'm at the top of this Cuban pyramid.


In addition to translating and trying out my grandmother's recipes, I've also been paying attention to my mom's cooking style, since she learned it from the source! Whenever I have a question about a vague set of instructions in the recipes, she comes to the rescue. This recipe is good enough for about four people, and I really don't think she can comprehend how to do such a thing. She cooks for a minimum of 8 people, which is actually an improvement over my grandmother's policy of cooking for 12-15 people. Seriously, we had pots that I have seen only in restaurant kitchens, they were so big. The following is an amended recipe, but in keeping with the flavor and style of the old recipe book.

The Pork

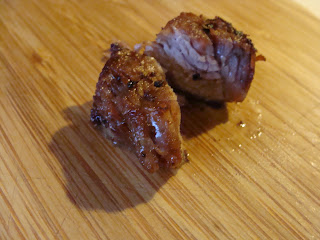
What is key to getting the pork right? Well, the right cut of pork, the right marinade, and making sure it's soft on the inside and glazed and crisp on the outside. It has taken me awhile to do this well on my own, but there are a few key tricks that most online and book recipes don't tell you. Here's the deal:

  • 2lbs of pork shoulder, cut into cubes

My mother buys pork shoulder. I always tried this recipe with pork tenderloin, because they always have it at the grocery store, but it didn't turn out too good. Don't get me wrong, it didn't taste bad, but it was tougher and drier than shoulder, which has a good deal of delicious fat running through it. I bought 2lbs of pork shoulder "ribs" for this meal that were cut like short ribs in long strips. I cut those strips into 1-2 inch cubes (saving a good piece with bone to flavor the beans) and put them in a big pot with a lid, added a little olive oil, salt and pepper, and then poured over the marinade, tossing to coat everything. I left it in the fridge overnight. For four people, you could use less pork, but you'll want leftovers. I used my leftovers to make tamales...but that's another post.

The Marinade
Goya makes an amazing product for this step called Mojo Criollo, or "creole marinade." It's what my family has always used, but for some reason the markets around me don't carry it. I know there's got to be some little bodega that has it, but it's not one of the more popular Goya products in my shopping area. If you do find it, step one is done- marinade accomplished. If you don't, here's how to make your own mojo criollo from scratch, which I like doing anyway.

Mojo Criollo
  • 1 cup of seville orange juice

Seville oranges grow in Cuba, and they tend to be bitter, but this is a central component to the marinade. If you don't have access to seville oranges, a good substitute is 2/3 c. of regular sweet orange juice mixed with 1/4 cup of lime juice.

  • 7-10 cloves of garlic, chopped
  • thinly sliced small onion/half a regular onion
  • teaspoon of salt
  • teaspoon of cumin
  • teaspoon of dried oregano
  • pinch of pepper
Mix it all together and pour it over the pork. You can pulse it in a food processor if you want. It doesn't have to completely cover the pork. Wait until the next day for it to really penetrate. Be sure to wait at least 8 hours.

Finally the next day arrives and you're ready to cook. Take the pork out of the fridge and set that pot right on the stove. Add enough water to the marinade to come up 3/4 of the way to the top of the meat. Add about 1/4 cup of vegetable oil. Heat to a simmer uncovered for 40 minutes. After the water has evaporated, you'll be left with very soft pork, the simmering marinade, and the oil.


This is the point where you turn up the heat a little and get the outside of the pork to be nice and crisp. If you need to add a bit more oil, do, but sparingly. I used a cast iron pot, but something non-stick would have been better, in retrospect. If the pork isn't browning up like you'd like, use a pinch of sugar to carmelize it up. The pic at the top of this section is what you want your pork chunks to look like, soft on the inside, brown and crisp on the outside. Delicious!

My mother's most recent Noche Buena pork and yuca.
She does something magical to make the pork break apart so delicately.
I think it's that there's just so much of it!


The Yuca

Yuca, or cassava, is a woody shrub grown for its edible root, which looks like the above picture and is sort of like a yam, but not very sweet. It looks pretty uggo if you ask me. It's native to South America and the surrounding tropics, so lots of other Latin-Caribbean cultures use it. People mash it, put it in soups, puree it up just like you would a potato. Basically, you cut off the bark, chop into 2-4 inch pieces and boil it for an hour to soften it. It has an interesting texture that I didn't used to like as a kid, but now I look forward to it every year.

  • 1 lb of yuca


Chopping off the bark is something I was unprepared for. It's tough and dangerous, and I found myself wondering when the hell my grandmother ever did this, because I certainly didn't remember her doing it or seeing the purple and brown bark bits around the kitchen. I asked my mom about it days later and she admitted that they had always bought it already peeled and frozen in the frozen vegetable section of the Latin market. Asian markets have it too. Wish I'd known!


Anyway, you make sure there's enough water to cover it and boil the chunks until they are soft, like fall off the fork soft, but before they disintegrate. It took mine about an hour, but they were large chunks. After they have been drained and any woody bits removed from the centers, set them on a plate, salt them, and drench them the garlic mojo, which is just garlic, onions and olive oil heated until fragrant. You can also fry it up a little in the oil and get the outside somewhat crispy, but remember olive oil burns faster than vegetable oil.

close up of yummy yuca with garlic mojo


The Black Beans


Black beans done the traditional way take time, a pressure cooker, and lots of patience. My way is a simple but tasty alternative.

  • 1-2 cups of black beans

You can soften black beans overnight or use (gasp!) canned black beans. If you use canned (and I totally secretly do), be sure they are low sodium, good quality, and that you rinse them well.

  • 1 tbsp. olive oil
  • 1/2 yellow onion, finely diced
  • 1/4 green bell pepper, finely diced
  • 3-4 cloves garlic, chopped

Start a small pot on medium-high heat and pour in theolive oil. Add in half an onion and maybe a quarter to a half of a green bell pepper. Salt and pepper them and sautee for a few minutes until their golden, then add the garlic. If you add the garlic too early, it will brown and bitter up your dish, so be sure to wait. You have just made what we call a "sofrito." This is the basis of a lot of Cuban dishes. Once the garlic has heated through, add the following spices:

  • 1/2 tsp. dried oregano
  • 1 tsp. cumin
  • 1 bay leaf

Then add

  • 1/4 cup of white vinegar
  • 1/4 cup dry white wine.
Finally, add the black beans and the piece of pork reserved from the pork dish (some people add a ham hock or just ham flavoring, but I've made this without any meat whatsoever and it still tastes great).

Your pot should look like this:

The beans are barely at the surface of the liquid. If you don't have enough liquid, pour in some water or stock/broth. If you have too much, just cook it longer. With this dish, the longer you let the beans simmer, the tastier they will be. I brought them to a boil and simmered them, uncovered, for about 2 hours. You could totally do it in one, but since I had all the other dishes going on, it wasn't hard to occasionally stir the beans.

Pour a couple of spoonfuls of beans over white steamed rice and you have yourself a meal!

Best way to make all of these together so they are all hot on the table:

Start the pork & marinade the day before (obvs.)

Next day, start the beans and get them to a simmer. (couple hours cooking time)
Put the pork on the stove and get it started. (1-1 1/2 hours cooking time)
Get the yuca started (1 hour cooking time, maybe less)

20 minutes from dinner-time, steam the rice
10 minutes from dinner time, cook up the oil/garlic/onion mojo for the yuca.

Yes, it's a pain in the ass dinner.
Yes, it requires a lot of your time.
That's why we do it once a year.

It's totally worth it!!

Tomorrow, how I turn the leftover pork chunks into tasty filling for Cuban style tamales.


Sunday, December 13, 2009

40 American Christmases

Have I ever told you my American Tale? Remember the movie An American Tail, about Fivel Mouskevitz, the animated Russian mouse who makes his way from Russia to America?

I totally remember that movie. I can still sing some of the songs and I don't think I've seen it in over 15 years. It came out in 1986, at which time I was about 9. I know that it seemed incredibly scary, the move to a totally different country. Of course, Fivel was separated from his family and had to navigate the new world by himself (see, scary!). But still, it's his immigration story. I don't have one, of course, I was born about 15 miles from where I'm typing this, but my family's story is an interesting one. And the fall/winter of 2009 marks the 40th anniversary of their journey from Cuba to America. Kind of a big deal, I'd say.

1969

Over 52,000 Cubans emigrated to the US in 1969. My mom's side of the family came over that year. My mother with her four siblings and two parents came in September. By October, the anti-war demonstrations in the US had reached epic proportions. In November, 500,000 people marched on Washington against the war. While hippies were dancing in Berkeley's People's Park, my mom and her family were adjusting to life outside of a dictatorship. Seeing American flags burn on the nightly news must have been quite the trip for a group of kids who were trained to sing the revolutionary anthem while assembling rifles. The Cuban educational system's motto, 'Estudio, Trabajo, Fusil' means "Study, Work, Rifle."


They settled in Lennox, a small town adjacent to Inglewood and LAX airport in southern California.

Cuba's immigration history is long and interesting. Since the United States has a history of instituting quotas for immigration from certain countries, people often hung out in Cuba, waiting to enter the U.S. This is partly how Cuba developed a variety of Asian, Jewish, and European enclaves. My family's history before Cuba is a mystery. The genealogical documents about when and how my family got to Cuba in the first place is all locked up over there, in databases and files that I can't access. Vague recollections and family gossip place them in Spain, Scotland, and Ireland. But I do have info on the immigration from Cuba to the U.S.

Both mom and dad came over (separately) on the Freedom Flights, the second wave of immigration after the Cuban communist revolution. The first wave was full of all of the rich folks, who could afford to jet out of Cuba as soon as Castro took power. Despite increases in available health care, education, and the enfranchisement of black Cubans, some of the revolutionary policies were seen as unbearable. The Freedom Flights assisted the middle and lower-middle classes, who had become increasingly dissatisfied with the policies curtailing political freedom and eliminating private property (some 55,000 small businesses were closed down by the government in an effort to eliminate private property in 1968). President Lyndon Johnson allowed for daily chartered flights to assist Cubans who wanted to permanently leave Cuba.

I now have my grandmother's and mother's Cuban passports, stamped with "Nulo" or void, which meant they couldn't return home because their passports were no longer valid.


Picture day for the passports was probably not a fun day, if their faces are any indication. Truly any bureaucratic appointment with 5 kids would probably be a nightmare. My mom says she is angry in this picture because she was bummed on her new haircut, which was too short for her taste.

These passports are powerful reminders of the consequences such a decision created for a young family. People who applied to leave were generally treated suspect, as they were defecting, and were given strict rules about leaving. Called "anti-revolutionaries," they were subject to a number of indignities.

In the case of my family, my grandfather was sent to work in the sugar cane fields far from home (quite the change of pace for a banker), while my grandmother cared for 5 small children by herself. Already accustomed to life under the regime, she had quite the side business making shoes out of old rubber tires and selling them on the black market so that she could get more ration cards or trade for goods that would feed her kids and make life bearable. My uncle (the oldest kid) has a story about how he was singled out in front of his whole school as a traitor on a day he thought he was getting an award. They haven't told me too much about what happened during the processing on their way out, but I gather it was a stressful and humiliating few days.

Leaving was the promise of something better, so they got out as soon as they could. They couldn't take much, and many of their family photos had to be mailed to them later, but they arrived in Florida and came to California, hoping to settle forever. You see, my family aren't the kind who are waiting to return, living in "exile." Many Cubans live "en exilio," waiting to return to Cuba to...well...I'm not sure what exactly they plan to do, but they believe that they were forced to leave a place they loved and that they want to go back there. Even so, my grandmother didn't become a citizen until the early years of this decade, just a few years before she passed away from pancretic cancer in 2004.

When she traveled to Spain in the 80s, she had to get some kind of passport. Due to her interesting situation (resident alien, Cuban refugee) her passport had this to say:


It must seem very strange and vulnerable to have no country. To feel like a stranger in your own home, so to speak. I wish now that I had asked her about that, and how she managed to make that kind of decision for such a large group of kids.

Just the other day I was talking to my mom about House Hunters International on HGTV, the show about buying a house in a different country. She and her husband (my step-dad, who was born in Mexico) were both fascinated with the show. They were talking about how "crazy" it must be to make the decision to move to a different country. To which I said "Hello!? You both did the exact same thing!" How quickly 40 years changes things.

This picture is of their first Christmas. They didn't have much, but they did have a tree and new, plastic covered couches. De rigueur for 1969.

Their story is one of many. In fact, a new PBS documentary about the Freedom Flights called My Suitcase Full of Hope just screened this past May and I just ordered the DVD today. I'm hoping to get a broader picture of their journey so I can ask my mom, aunts, and uncles some good questions.

On the eve of my mom's 40th American Christmas, I'm looking forward to celebrating the traditional Noche Buena (Good Night) a Christmas Eve party all about family and food. I'm planning to shadow her preparation of the dinner, so I can give you a good rundown of recipes and how they changed on the trip over.

Tuesday, May 12, 2009

Order Up!

Since I bailed on Nutrisystem (a combo of factors including money, money, and money), I have tried to keep up with the diet. I eat smaller portions, I eat way more veggies and fruits, and my snacks are much better than they were before. I used to grab chips, now I grab 100 calorie Smart Popcorn. I fit back into my jeans, which now require a belt! And now that the semester is closing up, I look forward to hitting the gym again. I just went today and felt amazing. So good that later on in the day I took a walk from my house to Portfolio, my local coffee spot 5 blocks away, even though I totally could have driven on my way to the store. The old me would have thought, "Hello? I already exercised today." But M. and I took the dog and sat out on the patio in the beautiful sunshine.

Anyway, I'm cooking again, which I love. So let me regail you with my latest stuff, some of which is good for you, some of which is not. All of which was tasty!

Cuban Ham Croquettes (aka croquetas de jamon)

I made just a few of these for Mother's Day. My mom loves croquetas, but never makes them. They are pretty easy to make, but apparently she's traumatized by my grandmother's method of making them, which was exactly like the method I am going to give you now, but only for like 20 people, which means a huge vat of bechamel sauce. If I had remembered that, I would have been intimidated. She once helped make 200 croquetas for my aunt's wedding. So she was very happy to have a plate of them without having to shell out time or money! Creamy and rich on the inside, with a tasty fried coating on the outside, you could die from too many of these. And it would be worth it.

Here's how my grandmother made them:

This recipe makes about 24 small croquetas (the size you see in the picture, about 2 inches long).

4 tbsp butter
1 tbsp chopped onion
1 cup milk
3/4 cups flour
1/2 tsp salt
1/2 tsp pepper
1 tbsp dry white wine
2 cups ham, chopped in a food processor (I used a black forest ham from the sandwhich deli meat section)

for the coating:
2 eggs for the egg wash
1 cup of cracker crumbs (you can use bread crumbs, but I like the coating to be fine, so I ground up some low sodium saltines)

vegetable oil for frying

1) Melt butter and sautee onion on medium heat in a skillet on medium heat
2) Add milk, flour, salt and pepper and cook on low heat
3) Stir constantly until you see the bottom of the pan. It will start to stick to itself and form a big mushy ball. Turn down the flame even more
4) Add the white wine and ham and mix it all together well (I also add chopped parsley, but it was not my grandma's style)
5) Remove from heat and let cool
6) Once cooled, refrigerate for 2 hours. It really helps you form them into a shape if they are cold, so if you skip the fridge, you will have blobs, not croquetas.
7) Once you are ready to start frying them up, make two dishes, one for the egg wash and one for the crumb coating.
8) Form the dough into balls and then flatten them out so they are in a croquette shape (cylindrical, if you will), then dip in the egg and then in the crumbs (just once each should do).
9) Fry those babies up in vegetable oil at 375 degrees. Once they are browned, set them on a paper towel to cool.

If you wanted to freeze them to make at a later date, just coat them and roll them in plastic wrap. You could also coat them and put them in the fridge to fry up the next day.

Great for an appetizer, a finger food (even good at room temperature after frying), or a side dish.
They should be soft but not runny.

That's a freebie, folks!

Peanut Butter Cupcakes with TWO Frostings.

I rarely get experimental with baking. I like to perfect recipes, not add to them, because they are so precise. If you add too much of something, your whole recipe fails and you have an inedible thing that smells good but goes right in the trash. This one paid off. Don't ask me how!

These are peanut butter cupcakes. I used 3/4 of the amount of peanut butter that the recipe called for (I got it from Connolly's 500 Cupcakes cookbook), and it made it not as heavy.


I also added a glaze to the tops of the cupcakes. I used a really basic vanilla glaze recipe you'd use for bundt cakes. After that cooled and formed a nice hard layer, I capped the whole thing off with a rich milk chocolate frosting. Chocolate, glaze, peanut butter, cupcake. So good! I brought them to a dinner party and got raves on them. I left them with the hosts and they called me the next day to tell me they were eating the rest of them. That's a good review, I think.

Tonight I didn't have any lettuce, so I made a simple salad.


Cherry tomatoes, sliced in quarters, cucumber, chopped walnuts, feta, and chopped parsley. I added a bit of lemon rind, some of my favorite dressing (Brianna's Blush Wine Vinaigrette), and a splash of balsamic vinegar.

On my diet, I had zucchini all the time. I still love it. I must, because I've been keeping the zucchini industry alive single handedly in the past 3 months with how much I keep on hand. Finally, though, I gave myself a treat and made some fried zucchini. I like to use bread crumbs, garlic powder, salt, pepper, a pinch of finely chopped parsley, and a bit of lemon rind in my batter. I'm not a big fan of heavy batters. I know some people do the whole beer batter thing for fried zucchini or fried mozzarella sticks. That sounds very heavy. I just dipped my small slices of zucchini in a light egg wash, tossed it in the dry batter, and fried it up quick (1 minute each side tops in hot oil). The result was a really tender but still crisp veggie with a barely there crunchy outside.


Tomorrow I am going to try to improvise my own flautas. I'll update you on how that goes!